Since I last posted about my experience with reduction linocut printing, we had one of our art meetings. And Louise brought me a “printing press”. It was made to emboss metal but it didn’t work the way Louise wanted it to so she said I could try it with my linocuts. It worked perfectly and saved me so much time! Thank you Louise!

So you can see the press on near the middle of the photo of my studio getting ready to print. It has the green foam sitting on it. The first thing I had to do was figure out how many layers were needed in the press to get the right pressure. Once I got that figured out it was great.
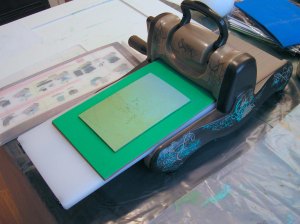

I used the registration jig on the far left to line up my lino block and paper. This is where I am printing the remaining backgrounds. I had gotten so tired the last time I was printing that I didn’t finish the full run. So the picture on the right shows the lino block with the paper on it. Then I covered that with another piece of paper and the acrylic block that is provided with the press.


I then rolled the sandwich through the press and it worked. It saves so much time and the prints are better than what I can achieve by hand. So I printed the rest of the backgrounds.

Then next step was to carve out everything that I wanted to stay blue/green. So here’s the linoleum block after carving. I made the background with random strokes so that if grey, brown or black gets on the background it just looks like branches. Then on to printing grey. The biggest problem was the registration. Even with my registration jig, my prints did not line up well. I realize now that my white areas should have been carved bigger to leave a little room for error. Note to self, remember this point for next time.

I printed my 16 prints and most did not line up very well at all. I have maybe 5-6 prints that are fairly well lined up. I stopped using my jig and just started eyeing the placement of the paper on the block and that worked better. Obviously my jig needs a bit of work. I have ordered some registration pins and I will use those next time. Not this series of prints since I didn’t leave enough of an edge to use the pins this time.

Here’s one of the prints that is lined up fairly well. Next, I have to carve out what will stay grey and then I will print brown. Then only one color left after that. This is quite the process! More updates to follow!

The press looks great – hope you can figure out how to get accuracy with it. Interesting article on registration pins here: http://www.black-prints.com/how-to-get-the-perfect-registration-with-ternes-burton-pins/
Looking forward to seeing how things progress!
Thanks Lyn! The press is not the problem with the accuracy. It was my registration method. I have ordered those same pins as in the link and saw a way to use them that I think will work well. But thanks for the link, always good to see different ways to try things. I am looking forward to the next step too. Hopefully, with the darker values, the bird will come to life 🙂
You are so welcome! I am glad that this press makes your life so much easier!!
Thanks again Louise, it is perfect for small prints.
Wow that is quite a process. I hope you get the registration problem corrected to make it easier to get good prints.
Thanks Marilyn, me too. I learn something with each step.