Another Machine Stitched Book Page

I worked on the third page for my machine stitched book. The instructions for this one was to have areas with minimal stitching, areas with moderate stitching and then small areas with very dense stitching.

 Here is the ‘sandwich’ that started the process. I used white nylon organza fused to the back of felt. The felt had been previously painted with Dye-na-Flow paint and the top layer is dyed silk organza. The layers are basted together.

 Next, I followed the organic lines that were formed in the dyeing of the silk organza and free motion stitched the layers together. I cut back some of the areas of silk organza to leave painted felt.

 Then I added stitching. I haven’t finished the edges yet because I’m trying to decide if I should add a touch of yellow. I don’t want to over stitch the piece and I should have added yellow earlier to integrate it in. I might just leave it as is.

There is a lot of surface texture since the dense stitching really compresses the felt so the more lightly stitched areas puff up a bit. Now I have to decide what I am going to do for the remaining two pages. My choice, hmmmm……

Machine Stitched Book Pages

Today I started working on my machine stitched book that I am making for homework for my last Level 2 Stitch Class. I finished two pages. The book needs to be 5 pages long so I have three more pages to make and then the binding. I also added a bit more dark red to my painting from yesterday.

 Here is the first book page. It is a combination of automatic machine stitches worked in patterns. These pages take a long time due to all the starting and stopping.

Here is the second book page. This one has the holes cut out first and then you stitch through lines across the piece right through the holes. Then I edged it with satin stitch. It looks a little wonky but it sort of turned out as I expected.

Here is the leaf painting again. I added another coat of red to the background. It is slightly darker than the photo shows. It is so hard taking a photo of red. The camera doesn’t seem to know where to focus. I also made a short video of my bead book. I am going to try and edit the video and post it on the Felting and Fiber Studio site tomorrow. Hopefully that won’t be too painful!

Painting Party

I met with my local art group today and we played with layered painting. I somehow forgot to take any photos while they were here. So all I have to show is my painting which is nowhere near finished.

 This is where I started with a fairly light painted background.

Here is what I finished today. There are two layers of leaves on here but I haven’t gone in and painted into the background. I need a lot of work to get darker values of red and to make the different layers of leaves show better.

Here’s a closer view. I love how the gesso under the paint shows through and gives texture to the painting. I have a lot more work to do on this one.

Interlaced Insertion Stitch

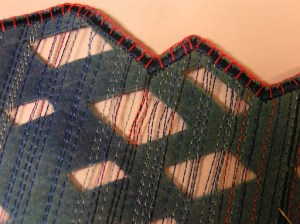
Today I tried the interlaced insertion stitch. I found it painful. First you do a double herringbone stitch between the edges and then you interlace it. When you do the herringbone, there is a certain way you are supposed to take the threads underneath each other as you stitch. I think I did this part wrong because when I tried to interlace following the instructions, it didn’t work. I had to go in different directions to make it work than what the instructions showed.

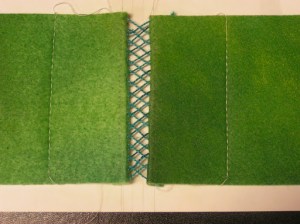
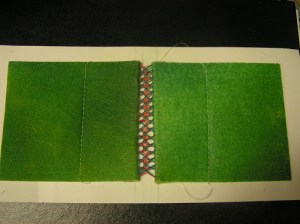
 Here is the double herringbone. I decided to take the stitch right through the fold. That was my first mistake.

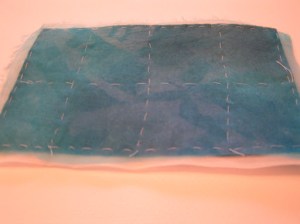
 I did mark little dots so I could get the stitch even.  I had difficulty tying the ending knot in the fold. If I do this again, which is doubtful, I would take a stitch in the edge.

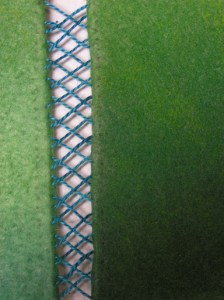
 Then I took an orange thread and interlaced the herringbone stitch. Here it doesn’t look so bad.

 But when you look in a closer view, the interlacing is really messed up.

The instructions said to use a thinner thread for interlacing but I think size 12 compared to size 5 was too much of a difference. I have tried all the interlacing stitches so next up for these little books is putting in pages. I have several ideas of how to do this so more sampling to come.